How to Approve or Reject a ServiceNow Approval Request

You have received an email that an approval request is waiting for you. The email will look similar to the example below.

RITMEMAIL
To find approvals that are waiting for your action:

1. Go to the service portal customer-viewpoint of 4Help at: http://4help.vt.edu

2. If you are not already logged in, log in using your PID and password, which you use for Canvas, Hokiespa, or MyVT.  Once you are logged in, you are looking at the webpage that displays “How can we help?” search box and image of the Bridge. (For reference, see the image under item 3.)

3. There are two ways to approve or reject a request. The first method is to go down to this same page. On the right of the screen, under My Approvals, you will see all the items that are waiting for you approval.

method1

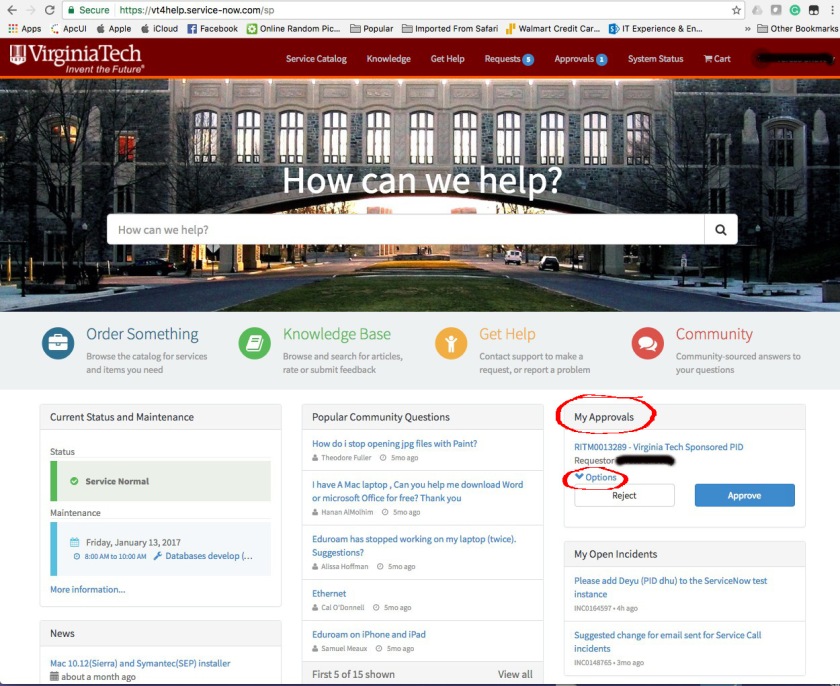
4. If you wish to see more details about the request, click Options to view details of the request. Otherwise, if you know the request well and just want to approve or reject the request,  click either the Approve button or the Reject Button to approve or reject a request.
ritmapprovalform

5. For the second method, in the top menu bar, to the left of your name, click the Approvals link.
method2

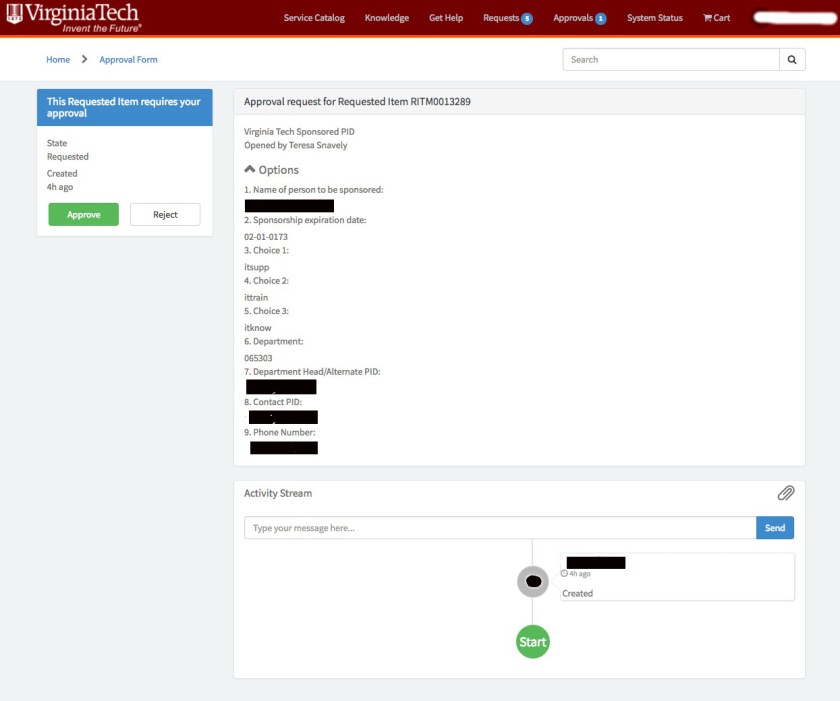
6. From here you can choose either to View all approvals or a specific request, which is Virginia Tech SponsoredPID RITM0013289 in the example below .
viewallapprovals

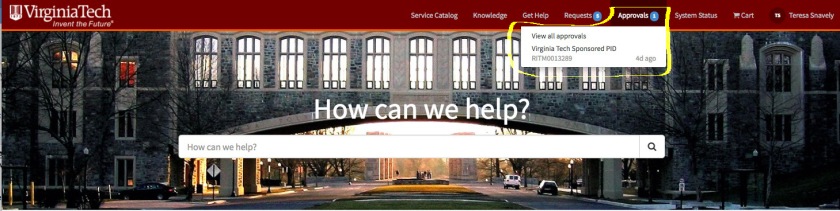
7. If you chose View all approvals, all approval requests will show on a screen.
ritmapprovals

8. If you choose to view certain request (in the example case it is Virginia Tech SponsoredPID RITM0013289), on the next page you will see the workflow and details of the requested item.
ritmapprovalform

9. Click either the Approve button or the Reject button.

10. You are now done with the approval; however, there may be other request items or catalog tasks that you or someone else needs to do to complete the workflow.

Combine Mac OS Screen Caputres into One PDF File Using the Automator

Combine multiple screen captures into one PDF file using the Automator under Mac OS X.

In my last post, I introduced how to use the command lines in the Terminal window in Mac OS to combine multiple screen captures into one PDF file. If you are not familiar with the command lines, it might be a little bit daunting. Today, I will introduce how to achieve the same goal using the Automator tool in Mac OS, which does not require you to have any programming background at all.

automator

Automator comes with Mac OS 10.4 or later. You can access it from the Applications. Automator allows you to create workflows and services that are repetitive in nature and kind of tedious for you to do manually. What we wish to accomplish here is exactly of that nature.

Once in Automator, you can choose the Workflow icon from the template to start a new workflow.

choseworkflow

What we want to do here involves three actions in Automator. First, select the folder where your screen capture images to be combined are located. Second, get the folder contents. Third, choose to combine the images to one PDF file. You can find relevant actions from the Files & Folders library and PDFs library respectively. Drag relevant actions to the right panel in the order that they will be executed and specify options for the actions. Save your workflow so that you can use it later. Click on the run button at the top right corner. It will ask you to select the folder. Once the folder is selected, the Automator will run. The log in the bottom right panel will show the processes and time used. Check the PDF file to make sure it is what you want. You are done. It is that simple.

automatorworkflow

Combine Mac OS Screen Captures into One PDF File

Combine multiple screen captures into one PDF file under Mac OS X.

You may have encountered the following situation: You have done multiple screen captures under Mac OS and you want to combine them into one PDF file without too much manual work. Here is what I did using the Mac OS Terminal and hope it will help you if you are in a similar situation. This solution has its advantage when you have a lot of files to process. It is much easier than the dragging and dropping method done in Preview.

There is/are one or two steps involved depending on if your default screen capture is in an image format or PDF format. If your default setting is in PDF format, you can skip Step 1.

Step 1: Convert image files to PDF files.

If like me, your default screen capture is in an image format, such as .png, you need to change each .png file to PDF file first. You can tweak the code a little bit if the images are in a different format, for instance, .jpg.

  • Make sure you have sips (scriptable image processing system), which comes with Mac OS 10.4 or later, on your computer. Type sips –h , you should see something similar to the image below if you have sips.sips
  • Put all the image files in a folder. Using the command line to go to that folder. Now you will need to do a batch processing use sips (note: before “out” there are two short “-“s, the display may show this as a long dash):
    for i in *.png; do sips -s format pdf $i –out $i.pdf; done
  • You can double check your folder to make sure everything is done right. Your file names may look like image1.png.pdf, which is OK and you do not need to change the file names.

Step 2: Merge PDF files into one PDF file

  • From Tiger onwards, Mac OS comes with a Python script that allows you to combine PDF files. Here is what you type or copy into the Terminal window. The combined file is named merged.pdf. Following that, you provide either a directory/folder for processing or list the individual PDF file directory and name. For me, all the PDF files waiting to be combined are in a folder named pdfs and the merged.pdf will be under the same directory as the pdfs
    “/System/Library/Automator/Combine PDF Pages.action/Contents/Resources/join.py” -o merged.pdf pdfs/*.pdf

That’s it. You are done. Check the file named merged.pdf to make sure everything is alright.